Setting Up Your First Enterprise Vault
Creating a vault in SSP Enterprise takes about five minutes. Getting it right takes a conversation beforehand, because two of the five choices in the wizard are permanent — they feed the address, and an address cannot be edited.
This guide walks the whole flow: what to decide before you start, each step of the wizard, what happens between creation and activation, and how to verify you got it right before any money arrives.
If the concepts are new, read SSP Enterprise: multisig vaults for teams first, and roles and permissions for who is allowed to do this.
Before you start
Four things to settle offline, ideally in writing.
- Which chain. A vault is on exactly one chain. If you hold Bitcoin and Ethereum, you need two vaults. This is not a limitation to work around — separate chains have separate addresses regardless.
- Who the signers are. Every signer must already have SSP Wallet and SSP Key set up, and must be a member of your organisation. Signers are people, not departments; "finance" cannot be a signer.
- What the threshold is. How many of those signers must approve. Consider both directions: how many people you need available to spend on a normal Tuesday, and how many could disappear before the funds become unreachable.
- What this vault is for. A vault with a job — payroll, reserves, a specific counterparty — is easier to set a threshold and policies for than a general-purpose one.
The threshold decision is the one people revisit most. 2-of-2 vs 2-of-3 vs m-of-n is worth reading before you pick, because picking again later costs a migration.
The five steps
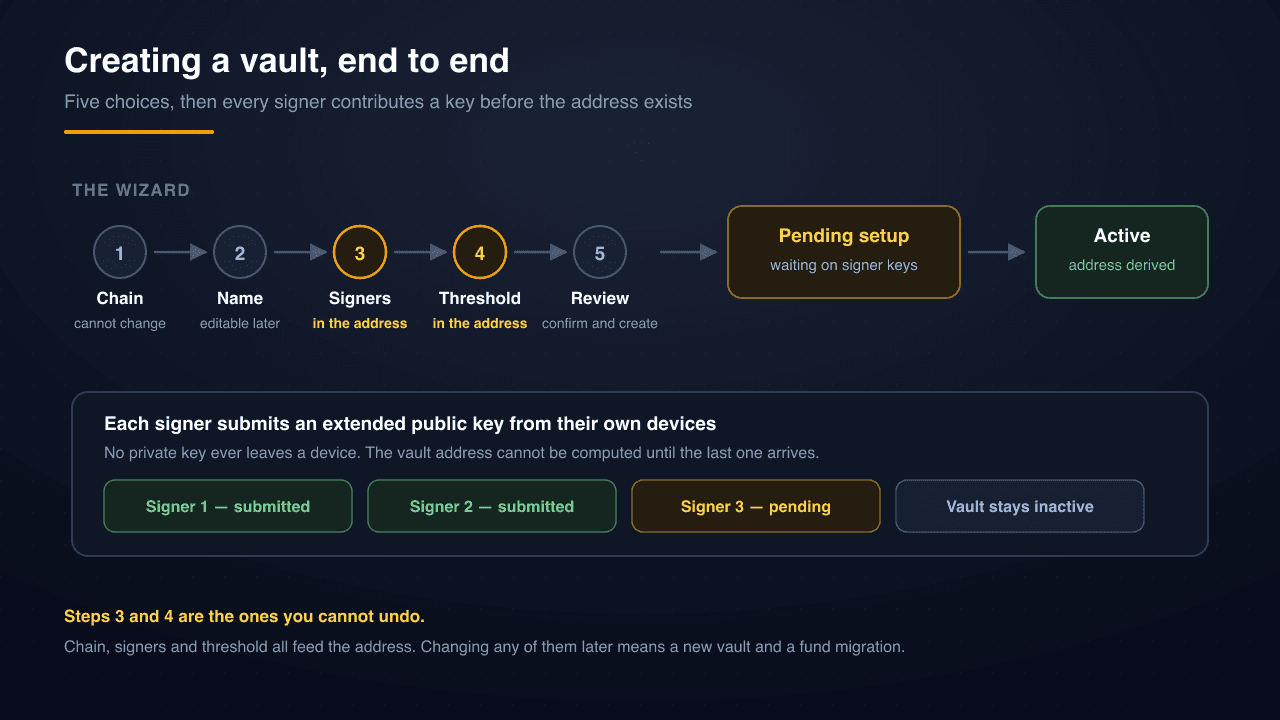
Step 1 — Chain. Pick from the chains SSP supports: Bitcoin, Litecoin, Dogecoin, Ravencoin, Flux, Zcash and Bitcoin Cash on the UTXO side; Ethereum, BSC, Avalanche, Polygon and Base on EVM; and Solana. Testnets are available for rehearsal, and rehearsing on a testnet before committing real funds is a good use of ten minutes.
Step 2 — Name. A label for humans. This is the one field you can change freely afterwards, so name it for what it does rather than what it holds: "Payroll" ages better than "Main".
Step 3 — Signers. Select the organisation members who will hold keys. Each becomes part of the address. Take the extra minute to confirm each person is the right individual and has their devices working — a signer who cannot sign is indistinguishable from a lost key.
Step 4 — Threshold. Set how many signatures are required. The interface will not let you pick an impossible combination, but it also will not tell you your policy is unwise; that judgement is yours.
Step 5 — Review. The last screen before creation. Read the chain, the full signer list, and the threshold aloud if you have someone to read them to. This is the last cheap moment to change your mind.
What happens after you press create
The vault does not become usable immediately, and this surprises people. It enters pending setup.
Deriving a multisig address requires every signer's extended public key. Those keys come from the signers' own devices — nothing private is transmitted, and SSP never sees a private key — but each signer has to actually do it. Until the last one arrives, the address cannot be computed, so the vault sits inactive and cannot receive funds.
In practice this means a short chase. Each signer opens the vault, submits their key from their paired devices, and the vault records a signer-key-submitted event. When the set is complete, the address is derived and the vault becomes active.
Two notes on this phase:
- Do not send funds to anything before the vault is active. There is no address to send to yet. If someone shares a "vault address" during setup, they are sharing something else.
- The chase is normal. A 5-signer vault waiting on one person for two days is an ordinary occurrence, not an error state.
Verifying before you fund it
Once the vault is active, do these four checks before any meaningful amount arrives.
Confirm the signer list matches what you agreed. Open the vault's members view and read it against your notes. This is the last easy moment to discover that the wrong colleague was selected.
Confirm the threshold. It is displayed on the vault. Check the number, not your memory of the number.
Do a round-trip with a trivial amount. Send a small amount in, then propose sending it back out and take it through the full approval flow. This tests the thing that actually matters: that the required number of signers can, in practice, sign. It surfaces the person whose SSP Key notifications are off, the phone that needs updating, and the signer who is on leave — all while nothing is at stake.
Check the address against a block explorer. Confirm the address SSP shows you exists and is empty, and that the explorer's view matches the balance the app reports.
Setting policies afterwards
With the vault active, you can add coordination controls: address whitelists, destination restrictions, time locks above a value threshold, and rules requiring admin approval for large amounts. Policy templates give you a sensible starting set you can then edit.
Be clear-eyed about what these do. They shape which proposals can be created and approved through the normal flow — they are process controls, not custody enforcement. The chain enforces the signature threshold and nothing else. Design the vault so it is safe with no policies at all, then add policies to make the day-to-day tidier.
Getting the operational details right
Add viewers generously. Auditors, accountants and anyone who needs to see balances should have vault viewer access. It costs nothing and reduces the number of "can you send me a screenshot" messages to zero.
Turn on notifications for the signers. A proposal that nobody notices is a proposal that expires. Each signer should have SSP Key notifications working before the vault holds anything.
Write down the recovery position. Note which signers exist, what the threshold is, and what happens if each one becomes unavailable. Then check the arithmetic: with your threshold, how many simultaneous losses can you absorb? Inheritance and emergency access is written for individuals but the reasoning transfers directly.
Decide the departure procedure now. When someone leaves the company, removing them from the organisation is a role change, but removing them as a signer requires a new vault and a migration. Knowing which you will do — and having rehearsed the migration on a testnet — turns a stressful week into a scheduled task.
If something goes wrong
A signer cannot submit their key. Check they have both SSP Wallet and SSP Key set up and synced, and that they accepted the organisation invitation. Key submission requires their paired devices, not just a login.
The vault has been pending setup for a long time. Look at which signers have submitted. The vault view shows this per signer, so the chase is targeted rather than a group email.
You picked the wrong threshold or signer set. If no funds have arrived, create a new vault correctly and abandon the first one — an unfunded vault costs nothing to leave behind. If funds have arrived, you are doing a migration: create the new vault, activate it, verify it with a small round-trip, then move the balance.
For how spending works once the vault is live, the proposal flow is covered in SSP Enterprise: multisig vaults for teams, and the original launch announcement covers what shipped.